Fun With Microcontrollers: installing MicroPython on the Espruino Pico
Recently, I became quite interested in a new microcontroller called the pyboard which gives you a low-level Python operating system that can be used to control all kinds of electronic projects. Sounds Fun!
Recently, I became quite interested in a new microcontroller called the pyboard (US|UK) which "is a small electronic circuit board that runs Micro Python on the bare metal, and gives you a low-level Python operating system that can be used to control all kinds of electronic projects".[1]
I've completed a number of projects with the Arduino, and Raspberry Pi, but I am particularly excited by MicroPython and the pyboard as they fit a great niche: the ease and flexibility of the Python programming language on a small and power efficient microcontroller. The only downside is that in September I will once again be tight on funds, as I am heading back to art school for one last last time again. As a result the pyboard's $44.95 USD price tag from Adafruit felt like a bit too much to spend on a fun experiment, without having a specific use in mind...
...buuuuuuuuuuut, after comparing the list of boards that MicroPython has been ported to, with what else is for sale on Adafruit, I found the Espruino Pico: an even tinier microcontroller for sale for only $24.95 USD! Of course, the lower price tag comes with comparably less functionality than the pyboard (the official pyboard is quite feature packed!), and also includes the burden of having to manually install MicroPython on the Espruino Pico.
Time to Install MicroPython on the Pico!
I've updated this post with instructions for two different ways to achieve our goal. In this post I'll start with the 'easy way', which will get us up and running a bit quicker. However, the second 'hard way' (I mean, it has a few more steps) is useful if you plan on hacking on the C code. In any case, both are kinda fun!
The Reasonably Easy Way
This set of instructions avoids the installation of alot of additional software, and removes the need to compile things from source. But still, before the real fun can begin we have to do a quick modification to our Espruino Pico.
Step 0: Preparing the board
To install new firmware onto to the Espruino Pico, we first need to figure out how to put the board into 'Device Firmware Upgrade' (DFU) mode. On the bottom of the board there is a set of BOOT0/BTN pads.
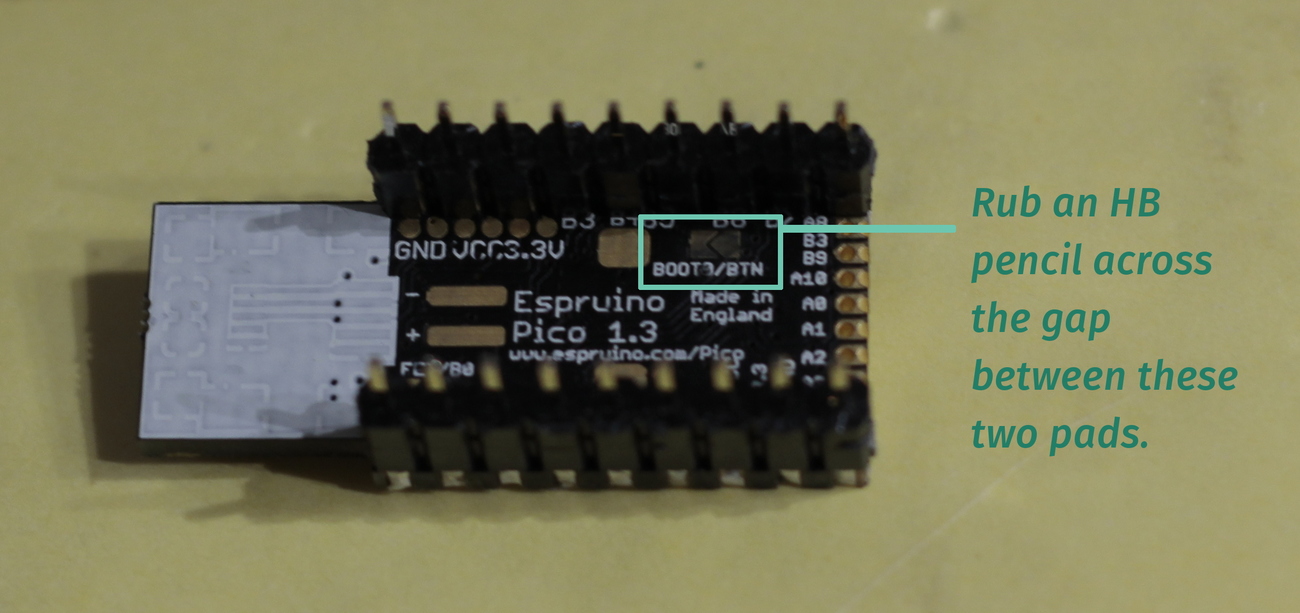
Shorting out this connection by rubbing an HB pencil across the gap will connect the push button on the top of the board to BOOT0. As a result, when you press the button and plug the board into a USB port (while continuing to hold down the button), the board will power up in DFU mode. Woo! If you would like some additional help programming the Pico, you can review the 'Advanced Flashing' section of this page.
Step 1: Getting the Software
If you visit https://micropython.org/download/ you will see a recent snapshot of the MicroPython software available to download. Additionally, at the bottom of the page there happens to be a 'Firmware for other boards' section, which includes a link to download a pre-built firmware image for the Espruino Pico![2] SO, grab a copy of each, and we can get started.
Take your micropython-master.zip file and extract it to your home directory. Then, in ~/micropython/tools you will find the file pydfu.py. This python script does rely on two dependencies that you may not have installed: pyusb, and libusb. If you are on Debian/Ubuntu you can solve this by running sudo apt-get install python-usb python3-usb, which will pull in libusb as a dependency.
For alternative instructions you can follow along here, and it should all work out okay. As of this writing, the most recent firmware file for the Pico is espruino-pico-2015-08-12-v1.4.5-1-gb7d5906.dfu, and so that is what I will use in the example below.
Step 2: Upload the Software
Move your firmware file to ~/micropython/tools, and in your terminal change your current working directory with a quick:
cd ~/micropython/tools
Now we just need to run:
sudo ./pydfu.py -u 'espruino-pico-2015-08-12-v1.4.5-1-gb7d5906.dfu'
If that completes successfully, then we did it! If things didn't quite work out then you may:
- not have properly put the Pico in DFU mode
- not have the right permissions to complete the above command
- have done everything right, but still strange things happen for some strange reason
If strange things are happening, then it might be useful to take another look at the 'Advanced Flashing' section of this page, or do a search on the MicroPython forum.
Anyway, now that we've installed MicroPython you can go on ahead to the Testing it Out section of this blog post, and do fun things!
The Harder-ish Way
If you would like to compile the project from source, and do things manually, the MicroPython dev wiki does include just about all the info you would need to get the job done, but if you're new to the project the necessary information is split across a few different pages. Really, this entire blog post is just a compilation of the wiki's material, using slightly plainer language, mostly so that I can keep a record for myself all in one place for future reference.
To get things started, take a look way up at Step 0, to get your Pico ready to be programed.
Step 1: Preparing your computer
Before we can do anything really exciting, we have to install some software. I am using Debian 8 for this process, but it should be similar for recent Ubuntu versions. Note that the bulk of the text for this section was abridged from this page of the wiki.
- Install dfu-utils
sudo apt-get install dfu-util
- Create a udev rules file.
- run
sudo nano /etc/udev/rules.d/49-stmdiscovery.rulesin your terminal, and enter the following contents:
- run
# f055:9800 - STM32F4 Discovery running MicroPython in USB Serial Mode (CN5)
ATTRS{idVendor}=="f055", ATTRS{idProduct}=="9800", ENV{ID_MM_DEVICE_IGNORE}="1"
ATTRS{idVendor}=="f055", ATTRS{idProduct}=="9800", ENV{MTP_NO_PROBE}="1"
SUBSYSTEMS=="usb", ATTRS{idVendor}=="f055", ATTRS{idProduct}=="9800", MODE:="0666"
KERNEL=="ttyACM*", ATTRS{idVendor}=="f055", ATTRS{idProduct}=="9800", MODE:="0666"
# 0483:df11 - STM32F4 Discovery in DFU mode (CN5)
SUBSYSTEMS=="usb", ATTRS{idVendor}=="0483", ATTRS{idProduct}=="df11", MODE:="0666"
That is the udev rule for the 'STM32F4 Discovery Board' from the MicroPython dev wiki linked above, I think it works in our case because the Discovery Board has the same usb vendor-ID:model-ID as the Espruino Pico. Or something.
- Tell udev to reload its rules:
sudo udevadm control --reload-rules
With this rule in place, we will not need to use sudo to deploy the firmware later on.
Step 3: Preparing the software
So. In order to put new firmware onto our Pico, we need to install some more additional software, and get the MicroPython software first.
You will need the following packages:
- build-essential
- libreadline-dev
- libffi-dev
- git
- gcc-arm-none-eabi
- binutils-arm-none-eabi
You can install these packages by running:
sudo apt-get install build-essential libreadline-dev libffi-dev git gcc-arm-none-eabi binutils-arm-none-eabi. This will also probably pull in a bunch of dependencies.
Note that the gcc-arm-none-eabi binutils-arm-none-eabi packages are needed as we will require an ARM compiler. More info here if needed.
Now, we can get the source for MicroPython by running:
git clone https://github.com/micropython/micropython.git
Once that is finished, to build for our platform we need to enter the directory for the stmhal port:
cd ~/micropython/stmhal/
Step 4: Do the thing!
And now, we are finally at the point where we can do the thing that we came here to do!
To compile the firmware we just have to run: make BOARD=ESPRUINO_PICO from within the ~/micropython/stmhal/ directory.
If you recall from way up in Step 0, now is definitely the time to put the board in DFU mode by shorting out the BOOT0/BTN pads, and plugging the board into your computer while holding down the button on the top of the board.
Aaaaaaaaand now you just need to run:
make BOARD=ESPRUINO_PICO deploy
If all goes well, your terminal output should look something like this (be patient, this may take a while!):

If this didn't work, it could be because:
- you don't have the packages installed to cross-compile for ARM
- the board was not powered on in DFU mode
- the udev rules thing didn't work out, in which case you can try
sudo make BOARD=ESPRUINO_PICO deploy - there is a mysterious problem which is mysterious.
If you run into a mysterious problem, review the full instructions for the Discovery Board. Or, take a look at Step 2 of the 'easy way', and see if that works better for you.
Testing it Out!
If the previous steps for either method all went smoothly, we can test out the board by unplugging it, and plugging it back in. If your computer mounts the board as a storage device named 'PYBFLASH' it all worked out! In your terminal you can now enter screen /dev/ttyACM0 (may need to be run as sudo, depending on your setup) to access the python interpreter running on the board itself! In the interpreter, some quick example code is:
>>> import pyb
>>> led = pyb.LED(1)
>>> led.toggle()
This will turn on the Pico's red LED. You can also run a script in the root of the PYBFLASH directory as soon the board boots up, as long as it is named main.py. You can read way more about all this on the MicroPython docs: http://docs.micropython.org/en/latest/. When you're reading the docs, the examples sometimes give reference to the pin names for the pyboard, but the Pico has a whole different set of names which you can review here: http://www.espruino.com/Pico. For example, in the fading LED tutorial instead of assigning the LED + timer on pin X1, you could use pin B13.
Wrapping up
When it comes down to it, microcontrollers are fun, python is fun, and the two of them together should be super-great. I am a big fan of the MicroPython project and I do encourage you to check out the pyboard (US|UK) as it is an all around more capable device than the Pico: the official pyboard has more storage, more ram, accelerometers, and etc.! However, it seems that for artists and students there is something of magic microcontroller price-point around $24-$30 USD, and so if flashing the Pico gets MicroPython in more people's hands...then that's great!
FINAL NOTE: If any of the commands/advice/whatever from this blog post cause you or your electronic devices any harm of any kind: I AM TOTALLY NOT RESPONSIBLE.
This quote, an explanatory video, tutorials, and more can all be found at micropython.org! ↩︎
Thank you to Damien who pointed out to me that pre-built firmware for the Pico can be found on this page. ↩︎